IAS Drupal 7 Sites Documentation
Text Editing
The WYSIWYG (what you see is what you get) text editor allows you to format the text. It’s ok for simple text formatting, but does not replicate the functionality of robust publishing soft ware like Word. It is encouraged that you use text styling only when needed; you don’t want to make the page look messy.
The WYSIWYG toolbar should look familiar if you are accustomed to any word processing program. You will find buttons for common things such as making text bold and italicized, adding an image, hyperlink, list, or pull quote, and setting the text’s style.
WYSIWYG tip: Use Shift+Enter to create a paragraph break without a large gap between lines.
Whenever you paste items into a text field be careful not to paste styles from external sources. You can avoid this by using the “Paste from Word” button. This will trigger a pop-up where you can paste the content and external styles will be deleted.
If text styles still are not working, try selecting the section of text needed and Click the “Remove Format” button (next to “Paste from Word”). This will re move most of the formatting.

Styling Text
You can use the text editor to add text styles to your content. Along with bold, italics, and underline, you can set heading styles, and may see other options. To add a heading, select the line of text that you wish to make a heading in the content window, and then choose a style from the “Paragraph Format” drop down. Note that by default all regular text will be set as a “Normal”. Under the “Styles” drop down there are also options for formatting the intro and text of a block quote. Note: In order to set a heading style the line that is being given the style must be separate from the next paragraph, ie. you can’t give something a heading style in the middle of a sentence.
Shortcodes
When creating an Idea, the following two shortcodes can also be used to format the body text. When using these formatting options, be sure to type them in the WYSIWYG. Do not copy and paste. Doing so will also paste unnecessary formatting information.
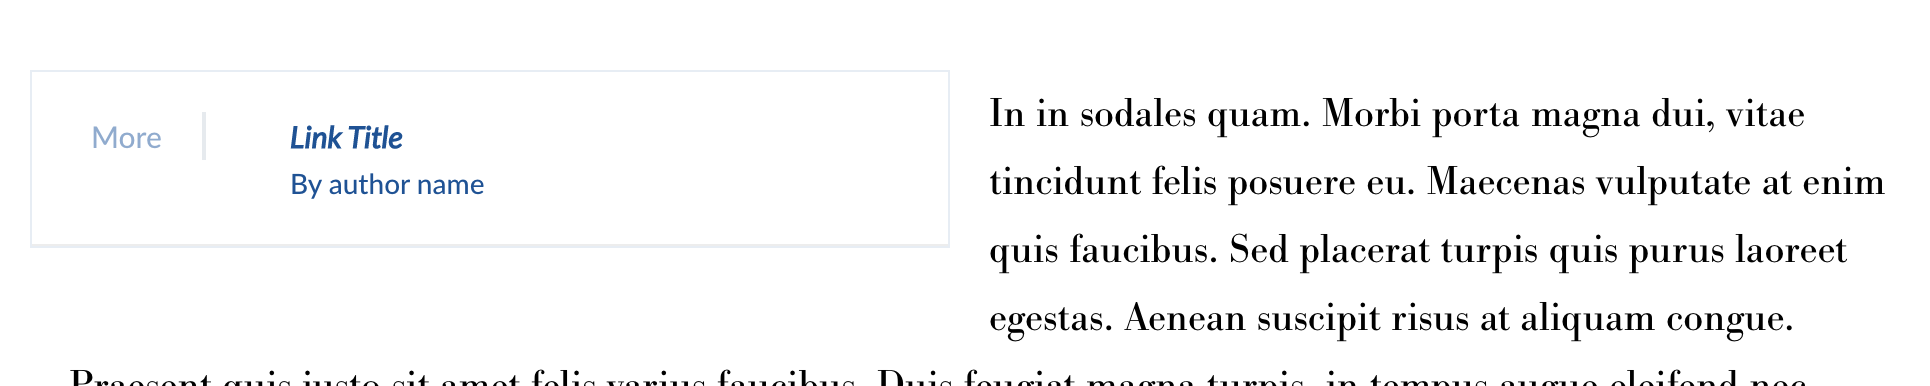
Add a link as a callout
[cb_shortcode url="http://sample.com" byline="author name" align="left"]Link Title[/cb_shortcode]
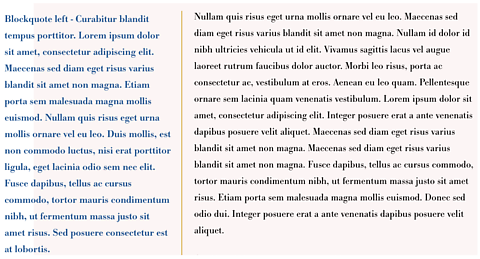
Data block
[data_block align="left|right"][/data_block]
Making Links
There are three different types of links you can add to a web page either by writing HTML or using the button on the text editor: email links, absolute links and relative links. Email links are links that go directly to someone’s email address, typically opening up an email client for the user to send a message to that address. Absolute and relative links refer to two different types of links that will take you from one page in a one website to a page in another, or from one page in a website to another within the same site. We will deal with absolute and relatives links first, offering more information about them below, and then will cover making email links.
Absolute vs. Relative links
“Absolute link” is a term that refers to links that go to other websites outside of http://example.com. To make absolute links work, they must have a full prefix in front of them, for example: http://example.com (not just example.com with no http://) to work. Often the easiest way to ensure that you have the correct URL for an absolute link (and don’t accidentally mistype something) is simply to copy the URL from the address bar of your browser to then paste it into the editing window (explained in detail below).
Relative links
Links that go from one page of your website to another. For example, you may wish to make a link from the About page to the Contact page - here you would only input /contact for the link. Relative links do not need the http:// protocol in front of them, nor do they need the example.com; they need only the rest of the information after the base URL.
Some things to note
- URLs should not have spaces in them, so where we intend a space to exist a dash“-“ is generally used.
- As convention, the URL paths are typically all lower case.
Making an absolute or relative link
- With your cursor, highlight the text you would like to make into a link.
- Click on the create link button in the text editor.
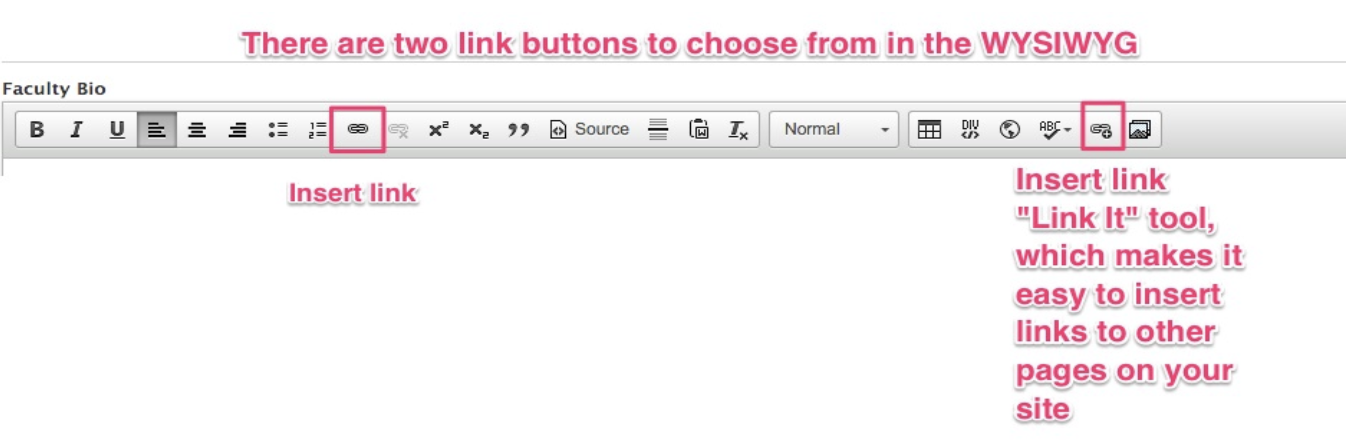
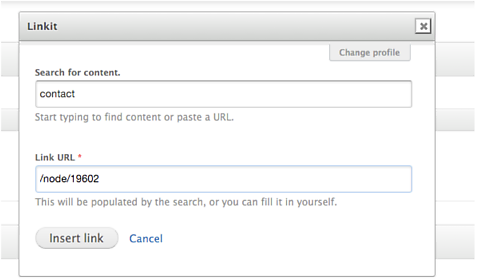
- There are 2 link buttons to choose from. The first on the left is the regular insert link button. The second on the right is the “Linkit” tool which makes it easy to insert links to other pages on this website.
- You will see a popup window that will help you configure your link:
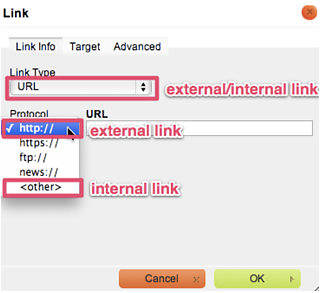
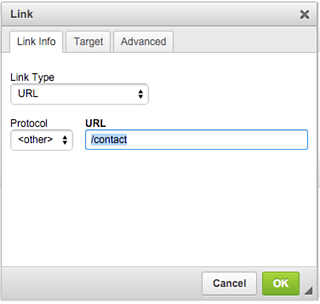
- The pop-up window will look similar to this image above. To set the link you must first fill out the required boxes in the pop-up window. Start with setting the “Link type” to “URL”.
- If it is a link to another website, choose the http:// protocol before the full link. If it is a link within the website, choose other and omit the base of the URL, ie. only put /about into the URL field. The image below shows an example of how to enter a link within the website to the Contact page. Remember to use the preceding slash (/).
- On the “Target” tab in the link popup, you can then choose the
“Target” for the link, if you would like it to open in a new window.
By default this box will stay at
which means internal links keep you in the same window, and external links will use the Browser default for a user’s computer.
Making an Email Link
- With your cursor, highlight the text you would like to make into a link – in this case this will typically be an email address or someone’s name.
- Click on the Create link button A pop-up window will open up.
- This time, select “Link Type” of “E-mail” and you
will see the following fields to fill in:
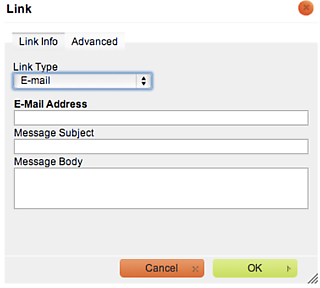
- The pop-up window will look similar to this image above. To set an email link you need only pay attention to the first field “E-Mail Address”, the rest are optional default text you can input. 5. Click “OK” and your email link will be created.
Deleting a Link
If, once you’ve inserted a link, you realize it is the wrong one, or that you no longer need it, you can easily remove it. Highlight the linked text, and click the “Remove link” button (next to the create link button).
Linking to Site Content: The “Linkit” Button
This is a helpful tool that allows you to quickly find a link to a page within your website. Start typing the name of the page you want to link to, and the tool will find and auto-fill the link.
Menu Links
Menu titles will default to the node title. To manually edit a menu title:
- Navigate to Structure > Menus.
- Under Operations select “list links” for the parent menu you want to edit.
- Select “edit” for the menu you want to change.
- Enter a new title in Menu link title.
- Save.